
You are looking for information, articles, knowledge about the topic nail salons open on sunday near me 윈도우 8 설치 on Google, you do not find the information you need! Here are the best content compiled and compiled by the Toplist.maxfit.vn team, along with other related topics such as: 윈도우 8 설치 윈도우8 다운로드, 윈도우8.1 무료, 윈도우8 iso 다운로드, 윈도우8 설치 usb 만들기, 윈도우8.1 자동인증 iso, windows 8.1 usb/dvd download tool, 윈도우 8.1 다운로드, 윈도우8 지원종료
- Windows 8/8.1 DVD를 옵티컬 드라이브에 넣고 컴퓨터를 재시작합니다. …
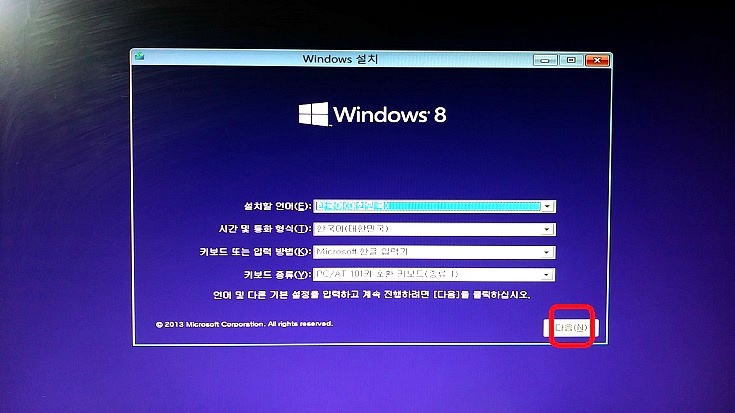
- 설치 언어, 시간 및 통화 형식, 키보드 또는 입력 방법을 선택하고 다음을 선택합니다.
- 지금 설치를 선택합니다.
Windows 8/8.1 Upgrade and Installation Instructions | Dell Vietnam
- Article author: www.dell.com
- Reviews from users: 49232
 Ratings
 - Top rated: 3.3
- Lowest rated: 1
- Summary of article content: Articles about Windows 8/8.1 Upgrade and Installation Instructions | Dell Vietnam Updating …
- Most searched keywords: Whether you are looking for Windows 8/8.1 Upgrade and Installation Instructions | Dell Vietnam Updating Windows 8/8.1 step-by-step installation instructions including DVD/USB upgrade as well as setup and personalization.windows 8, win8 install, upgrade install, windows 8 upgrade, windows 8.1
- Table of Contents:
Windows 8.1 ë¤ì´ë¡ë
- Article author: www.microsoft.com
- Reviews from users: 17783 Ratings
- Top rated: 4.1
- Lowest rated: 1
- Summary of article content: Articles about Windows 8.1 ë¤ì´ë¡ë Windows 8.1을 설치하거나 다시 설치해야 하는 경우 이 페이지의 도구를 사용하여 USB 플래시 드라이브 또는 DVD로 설치 미디어를 만들 수 있습니다. 시작하기 전에. 다음 … …
- Most searched keywords: Whether you are looking for Windows 8.1 ë¤ì´ë¡ë Windows 8.1을 설치하거나 다시 설치해야 하는 경우 이 페이지의 도구를 사용하여 USB 플래시 드라이브 또는 DVD로 설치 미디어를 만들 수 있습니다. 시작하기 전에. 다음 … windows 7 iso, how to reinstall windows 7, how to restore windows 7, download windows 7 iso, restore windows 7, software recovery, software restore, operating system recovery, Microsoft software recovery, Windows 7 software recovery, Windows 7 operating system recovery, Microsoft operating system recovery, Microsoft recovery, Windows 7 ISO, Windows 7 ISO image, Windows 7, restore Windows 7, reinstall windows 7, re-download Windows 7, Windows 7 disc image
- Table of Contents:
윈도우8.1 클린설치 (새로 설치) 방법 :: 도둑토끼의 셋방살이
- Article author: openart.tistory.com
- Reviews from users: 9345 Ratings
- Top rated: 3.6
- Lowest rated: 1
- Summary of article content: Articles about 윈도우8.1 클린설치 (새로 설치) 방법 :: 도둑토끼의 셋방살이 특히 윈도우8은 지원 종료되었기 때문에 필히 윈도우8.1로 새로 설치해야 한다. 윈도우8.1은 이렇게 클린설치(새로 설치) 가능하다. *. 주의: 인텔 6세대 … …
- Most searched keywords: Whether you are looking for 윈도우8.1 클린설치 (새로 설치) 방법 :: 도둑토끼의 셋방살이 특히 윈도우8은 지원 종료되었기 때문에 필히 윈도우8.1로 새로 설치해야 한다. 윈도우8.1은 이렇게 클린설치(새로 설치) 가능하다. *. 주의: 인텔 6세대 … 옛날에 윈도우98 시절에는 우스갯소리로 98번을 새로 설치한다는 말이 나왔지만, 윈도우2000, 윈도우XP부터 NT커널로 전환되면서 윈도우의 안정성이 크게 개선되어 새로 설치할 일이 많이 줄어들었다. 어쨌든 새..도둑토끼의 셋방살이
- Table of Contents:
윈도우81 클린설치 (새로 설치) 방법
티스토리툴바
초보도 가능한 윈도우 8 설치방법 : 네이버 블로그
- Article author: m.blog.naver.com
- Reviews from users: 11339 Ratings
- Top rated: 3.6
- Lowest rated: 1
- Summary of article content: Articles about 초보도 가능한 윈도우 8 설치방법 : 네이버 블로그 BIOS 부팅 순서와 윈도우 8 설치 CD/DVD에 문제가 없다면 아래와 같이 윈도우8 로고가 표시됩니다. 3. 기본 설정 메뉴입니다. 한국어 설정이 아닌 다른 … …
- Most searched keywords: Whether you are looking for 초보도 가능한 윈도우 8 설치방법 : 네이버 블로그 BIOS 부팅 순서와 윈도우 8 설치 CD/DVD에 문제가 없다면 아래와 같이 윈도우8 로고가 표시됩니다. 3. 기본 설정 메뉴입니다. 한국어 설정이 아닌 다른 …
- Table of Contents:
카테고리 이동
개인용 백신 Blog
이 블로그
스마트월드[PC스마트폰]
카테고리 글
카테고리
이 블로그
스마트월드[PC스마트폰]
카테고리 글
궁시렁궁시렁 IT이야기들 :: [윈도우] 윈도우 8 설치하기
- Article author: deviantcj.tistory.com
- Reviews from users: 21533 Ratings
- Top rated: 4.0
- Lowest rated: 1
- Summary of article content: Articles about 궁시렁궁시렁 IT이야기들 :: [윈도우] 윈도우 8 설치하기 지난 글인 [윈도우] 윈도우 8 USB 만들기 에 이어서 이번에는 ‘윈도우 8 … 여유가 있는 까닭에 노트북에 윈도8 (Windows 8)을 설치하게 되었습니다. …
- Most searched keywords: Whether you are looking for 궁시렁궁시렁 IT이야기들 :: [윈도우] 윈도우 8 설치하기 지난 글인 [윈도우] 윈도우 8 USB 만들기 에 이어서 이번에는 ‘윈도우 8 … 여유가 있는 까닭에 노트북에 윈도8 (Windows 8)을 설치하게 되었습니다. 지난 글인 [윈도우] 윈도우 8 USB 만들기 에 이어서 이번에는 ‘윈도우 8 설치하기’를 준비했습니다. 앞으로 윈도7 (Windows 7)의 지원기간이 그리 많이 남지도 않았고, 요즘 잠시 여유가 있는 까닭에 노트북에 윈..
- Table of Contents:
![궁시렁궁시렁 IT이야기들 :: [윈도우] 윈도우 8 설치하기](https://img1.daumcdn.net/thumb/R800x0/?scode=mtistory2&fname=https%3A%2F%2Ft1.daumcdn.net%2Fcfile%2Ftistory%2F24756B4253BE10C20D)
컴퓨터하는 오리 :: 윈도우8.1 윈도우8 설치 usb 부팅디스크 만들기 윈도우8.1 무료 다운로드
- Article author: windowspage.tistory.com
- Reviews from users: 12848 Ratings
- Top rated: 3.7
- Lowest rated: 1
- Summary of article content: Articles about 컴퓨터하는 오리 :: 윈도우8.1 윈도우8 설치 usb 부팅디스크 만들기 윈도우8.1 무료 다운로드 윈도우 8설치 usb만들려는 분들을 위해 올려봅니다. 윈도우 8 나온지 좀되었지만 아직 사용안해보신분들 있을거에요 윈도우8 설치 usb 만들어 설치해 … …
- Most searched keywords: Whether you are looking for 컴퓨터하는 오리 :: 윈도우8.1 윈도우8 설치 usb 부팅디스크 만들기 윈도우8.1 무료 다운로드 윈도우 8설치 usb만들려는 분들을 위해 올려봅니다. 윈도우 8 나온지 좀되었지만 아직 사용안해보신분들 있을거에요 윈도우8 설치 usb 만들어 설치해 … 오늘은 제목그대로 윈도우8.1 윈도우8 설치 usb 부팅 디스크 만들기 윈도우8.1 무료 다운로드 방법 을 알아보려고합니다 ~>< 윈도우 8설치 usb만들려는 분들을 위해 올려봅니다. 윈도우 8 나온지 좀되었지만 아..
- Table of Contents:
윈도우81 윈도우8 설치 usb 부팅디스크 만들기 윈도우81 무료 다운로드
최근에 달린 댓글
공지사항
윈도우8 설치 usb 만들기 윈도우8 (windows 8) ISO파일 다운로드 방법 :: 굴러가는 고구마
- Article author: lmj0513.tistory.com
- Reviews from users: 35483 Ratings
- Top rated: 4.6
- Lowest rated: 1
- Summary of article content: Articles about 윈도우8 설치 usb 만들기 윈도우8 (windows 8) ISO파일 다운로드 방법 :: 굴러가는 고구마 다만 윈도우 설치는 제품키가 필요합니다 윈동8 USB 부팅디스크 만들기 윈도우8 파일 다운로드 방법 어렵지 않아요.. 윈도우8 다운하실분은 아래 링크된 … …
- Most searched keywords: Whether you are looking for 윈도우8 설치 usb 만들기 윈도우8 (windows 8) ISO파일 다운로드 방법 :: 굴러가는 고구마 다만 윈도우 설치는 제품키가 필요합니다 윈동8 USB 부팅디스크 만들기 윈도우8 파일 다운로드 방법 어렵지 않아요.. 윈도우8 다운하실분은 아래 링크된 … 윈도우8 설치 usb 만들기 가능합니다^^ 윈도우8 설치 usb 만들기 윈도우8 다운로드 하는 방법을 모르시는 분들을 위해 설명해드릴려고합니다 저도 얼마전에 인터넷 검색 하다 알았는데요 윈도우8은 마이크로소프트..많은 분들과 정보를 교류하고 이야기나누고싶습니다
- Table of Contents:
관련글 관련글 더보기
인기포스트
See more articles in the same category here: toplist.maxfit.vn/blog.
Windows 8/8.1 Upgrade and Installation Instructions
This article provides a step-by-step guide for performing a clean install of Windows 8/8.1 on a computer, as well as retail DVD/USB upgrade installation instructions and post-installation setup and personalization.
If you need to get media to repair or restore your operating system to its original factory image, visit the Media Backup page to get information on creating recovery discs from your Dell computer or downloading an image online.
To get detailed information on using the Dell OS Recovery Tool to create an image, refer to KB article, “How to Download and Use the Dell OS Recovery Image in Microsoft Windows”
Insert the Windows 8/8.1 DVD into your optical drive and restart your computer. Select from the option that best fits your computer: Option 1 For computers that do not have UEFI BIOS, at the Dell logo screen, tap the F12 key repeatedly until the Please Select Boot Device: menu appears. Select CD/DVD/CD-RW Device and press Enter. Option 2 For computers that do have UEFI BIOS, At the Dell logo screen, tap the F2 key repeatedly until the System Setup menu appears. Then perform the following steps: Depending on the type of BIOS, you will need to find the Boot section using the Up and Down arrow keys. Ensure the following: The boot mode is set to UEFI
The setting for Secure Boot is Disabled
In the order of boot devices, either CD/DVD/CDRW or Internal ODD Device is the first item in the list Save the changes and exit System Setup to restart the computer. The Windows 8/8.1 Setup appears. Select Language to install, Time and currency format, and Keyboard or input method and select Next.
Select Install Now.
The Product Key screen appears.
Locate your Product Key and type it into the box provided, then click Next to continue.
The Product Key is a 25 character sequence, separated by dashes.
If a correct key is typed into the box, the line below the box will state, “Your product key works! Continue when you’re ready
If an incorrect key is typed into the box, the line will say, “This product key didn’t work. Please check it and try again, or try a different key” Read our article on Windows 8/8.1 product keys for more information. Dell factory-installed versions of Windows 8 and 8.1 do not require a product key for Dell computers. Accept the license terms described in the License Terms screen. Click the checkbox at the bottom of the screen to accept and click Accept to continue.
At the Which Type of Installation do you Want screen, select Custom: Install Windows only (advanced).
At Where do you want to Install Windows? screen, select Drive options (advanced). Remember that the next step will delete all existing information on your computer so be sure to back up what you want to keep. For a clean installation, delete all partitions that are shown by highlighting them one at a time and selecting Delete. After you have deleted all partitions selectUnallocated Space and then select New. Click Apply to create your new Windows 8/8.1 partitions, then click Next.
Windows will now be freshly installed on your computer.
Your computer will restart several times. This may take some time to complete installation.
Once you have reinstalled Windows, you will need to perform the original Windows setup. Refer to Dell Knowledge Base article, “How to Set Up Your New Dell Windows 8/8.1 Computer” for more information
Back to Top
Insert the Windows 8/8.1 DVD into your optical drive. If you are using a USB key, open the USB key folder in Windows Explorer and select Setup.exe
The Windows 8/8.1 Setup will automatically appear on your screen.
Select Go online to install updates now (recommended) and click Next.
The Product Key screen appears.
Locate your Product Key and type it into the box provided, then click Next to continue.
The Product Key is a 25 character sequence, separated by dashes.
If a correct key is typed into the box, the line below the box will state, “Your product key works! Continue when you’re ready
If an incorrect key is typed into the box, the line will say, “This product key didn’t work. Please check it and try again, or try a different key” Click here for more information on Windows 8/8.1 product keys. Dell factory-installed versions of Windows 8 and 8.1 do not require a product key for Dell computers.
Accept the license terms described in the License Terms screen. Click the checkbox at the bottom of the screen to accept and click Accept to continue.
at the bottom of the screen to accept and click to continue. At the Choose What to Keep screen, select the desired level of retention for settings and files. For more information, click Help Me Decide at the bottom of the screen to get details on what will and will not be kept with each selection. When you have made your selection, click Next to continue.”
screen, select the desired level of retention for settings and files. For more information, click at the bottom of the screen to get details on what will and will not be kept with each selection. When you have made your selection, click to continue.” The Making sure you’re ready to install screen will check your hardware and software for compatibility with Windows 8/8.1.
screen will check your hardware and software for compatibility with Windows 8/8.1. When finished, you will get a list of items that may be affected by Windows 8/8.1 upgrade on the What needs your attention page. Be sure to visit our Windows 8/8.1 Upgrade Checklist for information on your specific computer’s support of Windows 8/8.1 and drivers and software that may need to be updated or uninstalled before upgrading to Windows 8/8.1.
To proceed, you may need to uninstall or restart some applications. Proceed through the list from top to bottom, until the Refresh button at the bottom of the screen has changed to Next . Click Next to continue.
You may need to restart the installation of Windows 8/8.1 multiple times to proceed past the “What needs your attention” page.
If you have uninstalled software manually but it is still listed as needing to be manually uninstalled, restart your computer and restart the Windows 8/8.1 installation. You may need to restart the installation of Windows 8/8.1 multiple times to proceed past the “What needs your attention” page.If you have uninstalled software manually but it is still listed as needing to be manually uninstalled, restart your computer and restart the Windows 8/8.1 installation.
page. Be sure to visit our Windows 8/8.1 Upgrade Checklist for information on your specific computer’s support of Windows 8/8.1 and drivers and software that may need to be updated or uninstalled before upgrading to Windows 8/8.1. To proceed, you may need to uninstall or restart some applications. Proceed through the list from top to bottom, until the button at the bottom of the screen has changed to . Click to continue. At the Ready to install window, click the Install button in the bottom right to begin installation.
window, click the button in the bottom right to begin installation. Your computer will restart several times. This may take some time to complete installation.
Windows 8/8.1 will boot up for the first time. Proceed to Windows 8/8.1 Post-Install Setup. Back to Top Windows 8/8.1 post-installation actions
Personalize – select a color to set your color theme for Windows 8/8.1. This setting can be modified later.
Wireless – Connect to a wireless network to start updating your Windows files. If your network is not broadcasting its network name (SSID), click Connect to a hidden wireless network at the bottom of the screen. If your wireless network is not shown, click Connect to a wireless network later.
When you have selected your wireless network, click Connect at the bottom of the screen.
Settings – Dell recommends using the Express Settings to automatically set up Windows Updates and set automated controls to protect your PC.
Sign in to your PC – Sign in with a Microsoft Account or use a local account to sign in.
Be sure to watch the instructional video while setup completes to learn more about using the Windows 8/8.1 user interface.
Back to Top
윈도우8.1 클린설치 (새로 설치) 방법
옛날에 윈도우98 시절에는 우스갯소리로 98번을 새로 설치한다는 말이 나왔지만,
윈도우2000, 윈도우XP부터 NT커널로 전환되면서 윈도우의 안정성이 크게 개선되어 새로 설치할 일이 많이 줄어들었다.
어쨌든 새 컴퓨터를 사용하려면 윈도우를 설치해야 한다.
특히 윈도우8은 지원 종료되었기 때문에 필히 윈도우8.1로 새로 설치해야 한다.
윈도우8.1은 이렇게 클린설치(새로 설치) 가능하다.
*. 주의: 인텔 6세대 이상, AMD 라이젠 이상 시스템은 윈도우8.1 설치 제한됨. 6세대 스카이레이크 시스템에는 편법으로 설치 가능하지만 윈도우10을 사용할 것을 권장한다.
*. 윈도우7 이전 버전이 탑재되어 있는 컴퓨터라면 윈도우8.1 지원 여부를 확인해야 하는데, 방법은 [바로가기] 참조. 윈도우10의 요구사항과 거의 비슷하다. 다만 윈도우8.1은 인텔 2세대 샌디브릿지 내장그래픽을 정상적으로 지원한다.
준비물
4GB 이상 용량의 비어있는 USB 메모리 혹은 DVD
윈도우8.1 .iso 설치파일 및 rufus
윈도우8.1 정품 키
*. 본 포스팅은 USB 메모리를 통한 설치를 기준으로 함
*. 컴퓨터가 먹통인 상황이라면 스마트폰에서 USB 설치디스크를 작성할 수도 있다. [바로가기] 참조.
윈도우8.1 제품키 (시디키) 확인하기
윈도우8.1을 설치하려면 일단 제품키를 확인해야 한다.
컴퓨터 옆면 혹은 노트북 바닥에 XXXXX-XXXXX-XXXXX-XXXXX-XXXXX 형태의 제품키가 적혀 있는 스티커가 있다.
스티커가 없거나 제품키를 모른다면 [바로가기]를 통해서 확인 가능하다.
윈도우8.1 설치파일 다운받기 및 설치 디스크 작성하기
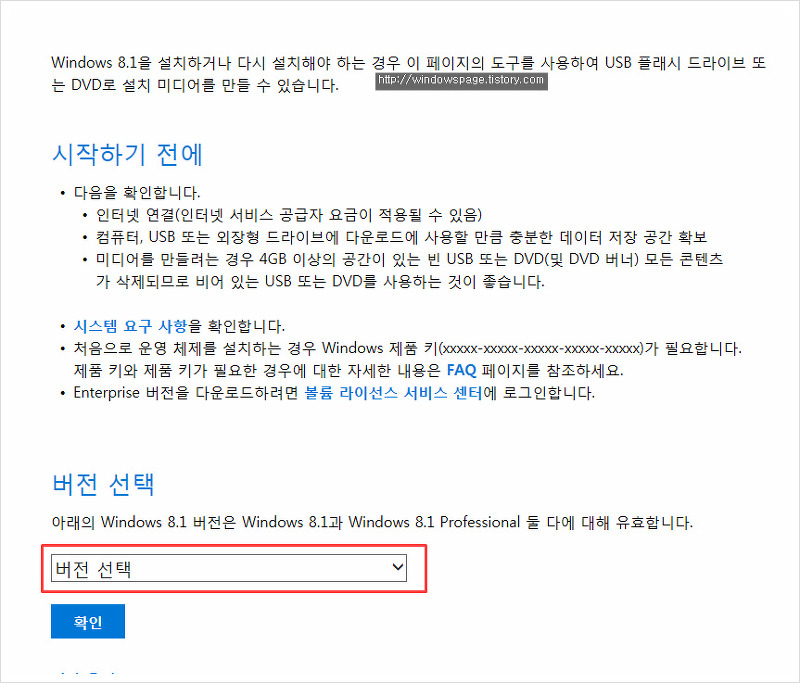
MS 홈페이지에서 윈도우8.1 순정 iso 설치파일 다운로드 가능하다[바로가기].
페이지 접속 후 “버전 선택” 부분을 클릭하자.
이어서 Windows 8.1 K를 선택하자.
*. 그냥 Windows 8.1 선택시 한국어 버전이 뜨지 않는다.
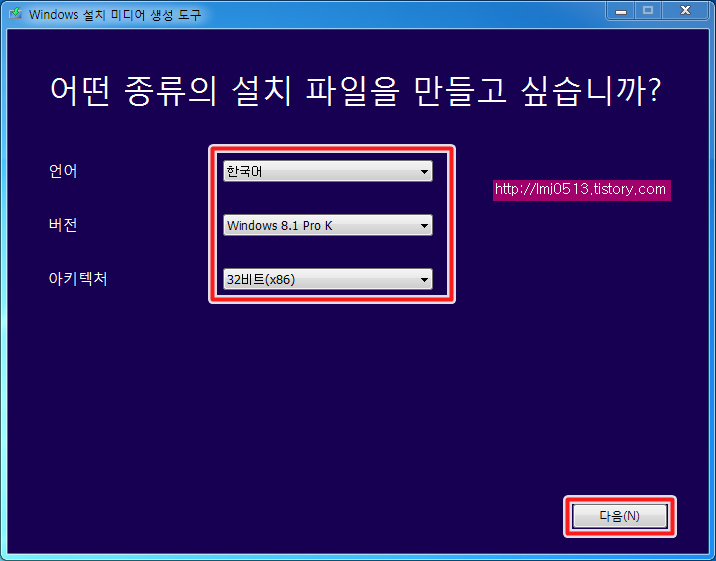
32비트 시스템이라면 32비트를, 64비트 시스템이라면 64비트를 클릭하자.
램 용량이 4GB 이상인 시스템이라면 64비트를 설치하면 되며,
시중에 출시되어 있는 램 2GB 이하 용량의 태블릿PC라면 32비트를 설치해야 한다.
윈도우8.1 설치파일 다운로드 경로를 지정해 주자.
이어서 .iso 파일로 USB 메모리 설치 디스크를 제작해야 한다.
RUFUS는 [바로가기]를 통해서 다운로드 가능하다.
“파티션 방식”은 오래된 구형 메인보드라면 MBR, 최신 UEFI 지원 메인보드라면 GPT를 선택하자.
“시작”을 클릭하면 된다. 물론 USB 메모리에 저장되어 있는 데이터는 싹 사라진다.
본격적인 윈도우 8.1 설치
1. 일단 컴퓨터의 C드라이브를 몽땅 날려야 하기 때문에 중요한 자료들은 미리 백업해 두어야 한다.
윈도우8.1을 설치하려면 컴퓨터의 하드디스크나 SSD가 아닌 USB 메모리로 부팅을 해야 한다.
컴퓨터가 부팅되자마자 USB 메모리로 부팅이 되도록 설정해야 하는데, 데스크톱 혹은 노트북 제조사마다 최초 부팅할 장치를 설정하는 방법이 조금씩 다르다.
컴퓨터를 켜자마자 아래 키 중 하나를 누르면 부트 옵션에 진입 가능하다.
삼성: ESC 혹은 F2
LG: F12
인텔: F10
ASUS: F8
AsRock: F11
Gigabyte: F12
MSI: F11
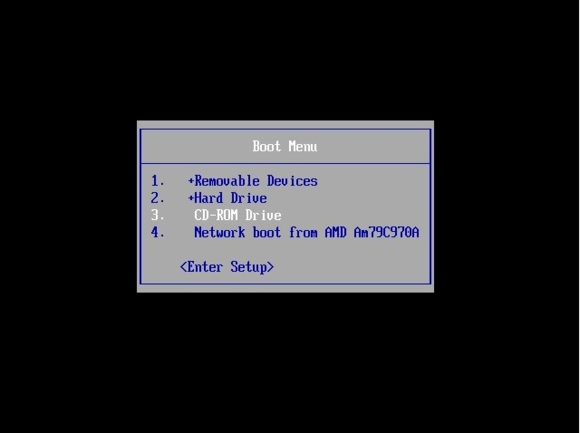
2. 부트 메뉴가 뜨면 장치를 선택해 주자.
USB 메모리인 장치를 키보드 위아래 키를 눌러서 선택하고 엔터키를 치면 된다.
(Sandisk를 선택했다)
3. 아래와 같은 화면이 뜨면 정상적으로 USB 부팅된 것이다.
“다음”을 클릭하자.
4. “지금 설치”를 클릭하자.
(좌측 하단의 “컴퓨터 복구”를 클릭하면 시스템 이미지 복원 가능한데, 본 포스팅에서 다룰 내용은 아님)
5. 라이선스 계약서가 뜬다. “동의함”을 체크하고 “다음”을 클릭하자.
그리고 이 과정에서 25자리 윈도우8.1 제품키를 입력해야 한다.
(본 포스팅의 윈도우8.1 설치파일은 Windows Embedded 8.1 Industry Pro라서 제품키 입력과정이 생략되어 있다. 통상적인 윈도우8.1 .iso 이미지는 제품키를 입력하게 되어 있다.)
6. 설치 유형을 선택해야 하는데, 새로 설치할 계획이니까 “사용자 지정”을 클릭하자.
7. 여기서부터가 아주 중요하다.
(윈도우가 없는 깡통 PC라면 8번으로 건너뛰자)
현재 컴퓨터 하드디스크에 윈도우가 설치되어 있는 상태라면 C드라이브에 해당되는 파티션을 선택한 다음 “삭제”를 클릭하면 된다.
그런데 하드디스크의 드라이브 문자가 표기되어 있지 않기 때문에 어떤 드라이브가 C드라이브인지 추측해서 삭제할 수밖에 없다.
아래 이미지에서 “드라이브 0 파티션 1: 시스템 예약” 아래에 있는 “드라이브 0 파티션 2″가 C드라이브이고, “드라이브 0 파티션 3″가 D드라이브이다.
중요한 데이터가 저장되어 있는 D드라이브는 물론 삭제하면 안되고, 시스템 예약 파티션과 “드라이브 0 파티션 2″만 삭제하면 된다.
8. 삭제되면 아래와 같이 할당되지 않은 공간으로 뜬다.
그냥 이 상태로 “다음”을 클릭하면 된다.
*. 깡통 하드디스크 혹은 SSD에 설치한다면 “새로 만들기”를 클릭해서 원하는 대로 파티션을 설정할 수 있다. C드라이브를 여유 있게 사용하려면 최소 30GB 이상을 잡아 주는 것이 좋다. 게임을 한다면 70GB는 되어야 한다.
9. 설치가 진행된다.
컴퓨터가 한차례 더 재부팅될 수 있다.
10. 컴퓨터가 재부팅되고 이런 화면이 뜬다면 이제 거의 마무리 단계에 이르렀다.
컴퓨터 이름을 적고 “다음”을 클릭하자.
*. 윈도우8.1은 컴퓨터 이름을 두 번 적게 되는데, 주로 사용되는 컴퓨터 이름은 추후에 입력하게 된다. 따라서 이름을 두 개 생각해 두는 것이 좋고, 원하는 이름은 이 단계가 아니라 추후에 입력하자.
11. 이런저런 설정값을 입력해야 한다.
개인적으로는 “사용자 지정”을 클릭하는 것을 권장한다.
12. 다른 컴퓨터와 파일을 공유하려면 “예”를, 그렇지 않으면 “아니오”를 선택하자.
(개인적으로는 “아니오” 권장)
13. 이 부분은 “내 앱을 자동으로 업데이트”를 제외하고는 모두 “켜짐”으로 설정해 주는 것이 좋다.
14. “일부 사이트의 환경 개선을 위해 Internet Explorer에 호환성 목록 사용”을 제외하고는 꺼 두었다.
“온라인으로 문제 해결 방법을 확인하기 위해 Windows 오류 보고 사용”은 켜 두는 것이 좋다.
15. 맨 하단의 “Windows Defender가 켜져 있을 때 정보와 파일을 Microsoft Active Protection Service로 보내 맬웨어 방지 강화” 부분은 켜 두는 것이 좋다.
*. 윈도우8.1은 Windows Defender 백신이 내장되어 있어서 따로 백신 프로그램을 설치하지 않아도 된다. 하지만 이럴 경우 윈도우 보안 업데이트를 활성화해 두어야 한다.
16. MS 계정이 있다면 ID와 비밀번호를 입력하자. 그런데 윈도우8.1은 사실 MS계정이 그렇게 유용하지 않다.
오프라인 계정으로 사용하는 경우에도 일단은 “새 계정을 등록하세요”를 클릭하자.
(본 포스팅은 오프라인 계정을 기준으로 함)
17. 오프라인 계정으로 사용하려면 하단의 “Microsoft 계정을 사용하지 않고 로그인”을 클릭하자.
18. 오프라인 계정의 사용자 이름과 암호를 입력하자.
참고로 10번에서 입력했던 컴퓨터 이름과, 아래 “사용자 이름”은 서로 달라야 한다.
19. 윈도우8.1 설치가 완료된 모습.
기타
-. 윈도우8.1은 윈도우7과 마찬가지로 보안 업데이트 소요시간이 매우 오래 걸린다. 반드시 [바로가기]를 참고해서 패치를 설치하고 빠르게 업데이트하자. 최신 업데이트 상태를 유지해 주어야 랜섬웨어 등 악성코드를 피할 수 있고, 업데이트를 적용해 주어야 사용하기 편한 UI로 바뀐다.
-. 랜카드 드라이버가 잡히지 않아서 인터넷이 되지 않을 경우 [바로가기]를 참고하면 응급 인터넷 접속 가능하다.
-. 윈도우10과 마찬가지로 윈도우 보안 업데이트 과정 중 대부분의 장치 드라이버들이 자동으로 설치된다.
초보도 가능한 윈도우 8 설치방법
윈도우8 설치 방법
윈도우 8은 윈도우 7과 XP에 비해 설치 방법 및 시간이 간단하여 누구든 쉽게 설치할 수 있습니다.
약 10분 정도면 설치가 완료되며 윈도우8 재설치를 위해 재설치용 CD/DVD를 준비합니다.
본 포스팅에서는 설치 방법에 대한 설명을 하고 다음 포스팅에서는 윈도우8의 파티션 분할 방법에 대해 알아보겠습니다.
1. 윈도우 CD/DVD설치를 위해 부팅순서를 변경해야 합니다.
부팅순서는 각 PC의 제조사별로 차이가 있으므로 CD/DVD부팅 방법에 대해서는 제조사에 문의해 주세요.
보통 F5 부터 F9 중 하나의 키를 누르면 아래와 같은 부팅 메뉴를 확인할 수 있으며 아래와 같은 화면이 나오지 않는 경우 BIOS 셋업에서 부팅 순서를 변경해야 합니다.
CD-ROM 부팅을 시작합니다.
2. BIOS 부팅 순서와 윈도우 8 설치 CD/DVD에 문제가 없다면 아래와 같이 윈도우8 로고가 표시됩니다.
3. 기본 설정 메뉴입니다. 한국어 설정이 아닌 다른 언어로 설정하는것이 아니라면 기본 설정값을 그대로 유지하여 다음 버튼을 클릭합니다. 4. 윈도우8 설치 화면이 표시되면 ‘지금 설치’를 클릭합니다. 5. ‘Microsoft 소프트웨어 사용권 계약’ 하단 동의함을 V체크 한 후 다음을 클릭합니다. 6. 설치 유형 선택 화면입니다. ‘사용자 지정:windows만 설치(고급)’ 을 선택합니다. 업그레이드:Windows를 설치하고 파일, 설정 및 응용 프로그램 유지 ==> 윈도우를 덮어씌우기 설치로 기존에 윈도우 8에서 사용하던 사용자의 설정값 및 파일을 그래로 두고 설치합니다. [권장]사용자 지정:windows만 설치(고급) ==> 윈도우8을 포맷하여 클린 설치 기능을 제공합니다. 7. 사용자 지정을 클릭하면 아래와 같은 화면이 보여집니다. 기존 윈도우를 사용시 파티션을 분할 하였다면 해당 파티션의 용량을 통해 판단이 가능하니 C파티션만 포맷을 할 경우 C파티션의 대략적인 용량을 기억해 두는것이 좋습니다. C파티션을 클릭하여 하단 드라이브 옵션(고급)을 클릭하면 하단 메뉴에 파티션 포맷 버튼이 활성화 됩니다. 파티션 포맷 완료 후 다음 버튼을 클릭하면 선택한 파티션에 윈도우 설치를 시작합니다.
8. 윈도우8 설치가 완료되면 제품 라이선스키를 입력하는 화면이 보여지며 정품 윈도우8의 경우 CD 또는 CD케이스에 라이선스 키를 확인하여 입력하고 다음 버튼을 클릭합니다. 9. 개인 설정 화면으로 바탕화면 배경색 및 PC의 이름을 설정할 수 있습니다. 사용자가 원하는 배경색 및 이름을 입력한 후 다음을 클릭합니다. 10. 기본 설정 메뉴로 윈도우 설치 완료 후 변경이 가능하므로 기본설정 사용을 클릭합니다. 10-1. 10번 항목에서 사용자 지정을 클릭하면 아래와 같은 화면을 볼 수 있으며 Microsoft계정 생성을 통해 Microsoft에서 제공되는 정보를 받아 볼 수 있습니다. 10-2. 계정 설정이 완료되면 간단한 PC사용법을 보여줍니다. 11. 윈도우8을 부팅시 보여지는 사용자 이름 및 암호 설정 화면입니다. 암호를 설정하지 않으려면 빈칸으로 남겨두고 마침을 클릭합니다. 12. 설치 마무리 화면을 볼 수 있습니다.
13. 설치가 완료되면 아래와 같은 화면을 볼 수 있으며 좌측 하단 데스크톱을 누르면 기존 윈도우와 비슷한 바탕화면을 볼 수 있습니다.
14. 일반적으로 윈도우XP 및 윈도우7의 경우 윈도우를 설치한 후 장치드라이브를 추가로 설치해야하는 반면에 윈도우8은 거의 모든 드라이브가 자동으로 설치되어 이전 버전의 윈도우에 비해 보다 간편하게 사용할 수 있습니다.
So you have finished reading the 윈도우 8 설치 topic article, if you find this article useful, please share it. Thank you very much. See more: 윈도우8 다운로드, 윈도우8.1 무료, 윈도우8 iso 다운로드, 윈도우8 설치 usb 만들기, 윈도우8.1 자동인증 iso, windows 8.1 usb/dvd download tool, 윈도우 8.1 다운로드, 윈도우8 지원종료