
You are looking for information, articles, knowledge about the topic nail salons open on sunday near me 윈도우 8 메일 on Google, you do not find the information you need! Here are the best content compiled and compiled by the Toplist.maxfit.vn team, along with other related topics such as: 윈도우 8 메일 Windows 10 mail setup, Windows 10 Mail app, Microsoft Gmail, Mail and calendar, Outlook desktop download, Outlook 2016 update
Windows 8 메일 앱 설정방법 : 네이버 블로그
- Article author: m.blog.naver.com
- Reviews from users: 37671
 Ratings
 - Top rated: 4.7
- Lowest rated: 1
- Summary of article content: Articles about Windows 8 메일 앱 설정방법 : 네이버 블로그 Windows 8 메일에서는 POP(Post Office Protocol) 설정은 지원하지 않으므로,. IMAP 설정의 계정 추가만 가능합니다. 1. 메일 앱을 실행합니다. …
- Most searched keywords: Whether you are looking for Windows 8 메일 앱 설정방법 : 네이버 블로그 Windows 8 메일에서는 POP(Post Office Protocol) 설정은 지원하지 않으므로,. IMAP 설정의 계정 추가만 가능합니다. 1. 메일 앱을 실행합니다.
- Table of Contents:
카테고리 이동
임군 님의 블로그
이 블로그
Mail System
카테고리 글
카테고리
이 블로그
Mail System
카테고리 글
Windows 8 메일 앱에 계정 추가하는 방법을 알려주세요. [삼성전자서비스]
- Article author: www.samsungsvc.co.kr
- Reviews from users: 44616 Ratings
- Top rated: 3.1
- Lowest rated: 1
- Summary of article content: Articles about Windows 8 메일 앱에 계정 추가하는 방법을 알려주세요. [삼성전자서비스] Windows 8 메일 앱에 계정 추가하기(편) SS-104(K) 본 영상은 일반 사용자들을 대상으로 개인 컴퓨터(PC) 사용에 도움을 주기 위한 목적으로 제작되었습니다. …
- Most searched keywords: Whether you are looking for Windows 8 메일 앱에 계정 추가하는 방법을 알려주세요. [삼성전자서비스] Windows 8 메일 앱에 계정 추가하기(편) SS-104(K) 본 영상은 일반 사용자들을 대상으로 개인 컴퓨터(PC) 사용에 도움을 주기 위한 목적으로 제작되었습니다.
- Table of Contents:
How to Set Up Email on Windows 8 (with Pictures) – wikiHow
- Article author: www.wikihow.com
- Reviews from users: 44403 Ratings
- Top rated: 3.5
- Lowest rated: 1
- Summary of article content: Articles about How to Set Up Email on Windows 8 (with Pictures) – wikiHow Updating …
- Most searched keywords: Whether you are looking for How to Set Up Email on Windows 8 (with Pictures) – wikiHow Updating Windows 8 introduced the Modern UI, which integrates a lot of common system functions into unified apps. One of these new apps is the Mail app. This is a touch-friendly email program that is much more straightforward than the traditional…
- Table of Contents:
Steps
Community Q&A
Video
By using this service some information may be shared with YouTube
Tips
You Might Also Like
References
About This Article
Is this article up to date

Windows 8: Using the Mail App
- Article author: edu.gcfglobal.org
- Reviews from users: 16804 Ratings
- Top rated: 4.9
- Lowest rated: 1
- Summary of article content: Articles about Windows 8: Using the Mail App The first time you open the Mail app, you will need to connect an email account to start sending and receiving email. If you are signed in to Windows 8 with a … …
- Most searched keywords: Whether you are looking for Windows 8: Using the Mail App The first time you open the Mail app, you will need to connect an email account to start sending and receiving email. If you are signed in to Windows 8 with a … The Windows 8 Mail app is where you can manage and view your email messages. Learn more about using the app in this free lesson.
- Table of Contents:

Windows 8: 메일 앱 작업 – Windows1x.com
- Article author: windows1x.com
- Reviews from users: 31001 Ratings
- Top rated: 4.5
- Lowest rated: 1
- Summary of article content: Articles about Windows 8: 메일 앱 작업 – Windows1x.com 앱은 이전 버전에서는 볼 수 없었던 Windows 8의 주요 기능입니다. 이 튜토리얼에서는 Mail Windows 8의 앱을 살펴보고 모든 이메일 계정을 관리하는 데 이 앱을 … …
- Most searched keywords: Whether you are looking for Windows 8: 메일 앱 작업 – Windows1x.com 앱은 이전 버전에서는 볼 수 없었던 Windows 8의 주요 기능입니다. 이 튜토리얼에서는 Mail Windows 8의 앱을 살펴보고 모든 이메일 계정을 관리하는 데 이 앱을 …
- Table of Contents:
이메일 설정
노트
이메일 계정 간 전환
이메일 계정을 제거하는 방법
더 나은 이메일 관리 앱

See more articles in the same category here: toplist.maxfit.vn/blog.
Windows 8 메일 앱 설정방법
Windows 8 메일 앱 설정방법
현재 사용하시는 프로그램의 버전에 따라 인터페이스의 차이가 있을 수 있습니다.
– Windows8 의 메일 앱은 반드시 Microsoft 의 메일 계정(hotmail.com, outlook.com 등) 의 메일계정으로 로그인 해야지만 다른 메일계정 설정이 가능합니다.
– Windows 8 메일에서는 POP(Post Office Protocol) 설정은 지원하지 않으므로,
IMAP 설정의 계정 추가만 가능합니다.
1. 메일 앱을 실행합니다.
ㄱ. 시작화면에 메일 앱 클릭하여 실행하기
[그림1. windows 8 시작화면]ㄴ. 메일 앱 검색 후 실행하기
[그림2. ‘검색’ 기능을 이용한 메일 앱 찾기]2. Microsoft 메일 계정으로 로그인 합니다.
ㄱ. “다시 시도해 보세요” 클릭하여 로그인을 진행합니다.
[그림3. 매일 앱 초기 실행 화면]ㄴ. Microsoft 메일 계정으로 로그인 합니다. (hotmail.com , outlook.com , live.com 등)
[그림4. Microsoft 계정 로그인 화면]ㄷ. Microsoft 계정이 없으실 경우 “Microsoft 계정 만들기” 를 통해 Microsoft 계정을 생성하여주세요.
[그림5. Microsoft 계정 만들기 화면]3. 설정 – 계정 메뉴 클릭하여 계정 추가
ㄱ. 우측 상단 코너에 마우스를 오버하면 우측 메뉴가 활성화가 되며, 메뉴 중 “설정” 을
선택합니다. (터치스크린의 경우 화면의 가장자리에서 안쪽으로 밀어주세요)
[그림6. 설정 메뉴 선택 화면]ㄴ. “계정” 을 선택하여 U+ 메일호스팅 메일계정 설정을 합니다.
[그림 7. 계정 메뉴 선택 화면]4. “계정 추가” – “다른 계정” 메뉴 선택하여 새 계정을 설정합니다.
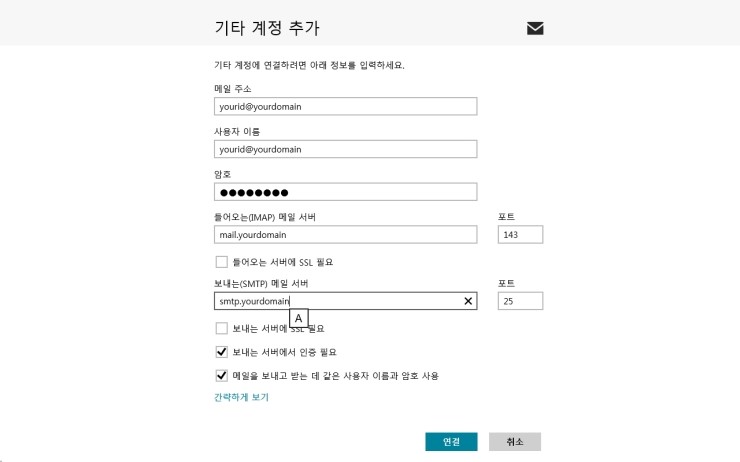
[그림8. 새 계정 생성하기 화면]5. ‘그림7’ 과 같이 “자세한 내용 표시” 를 클릭하여 메일 설정 정보를 입력합니다.
[그림9. 기타 계정 추가 화면]6. IMAP 방식의 계정 설정 정보 입력하여 메일 셋팅을 완료합니다.
ㄱ. “자세한 내용 표시” 클릭 후 설정 화면
[그림 10. 기타 계정 추가 입력하기]
Windows 8 메일 앱에 계정 추가하는 방법을 알려주세요. [삼성전자서비스]
동영상을 보시려면 재생버튼(▶)을 눌러 주십시오.
[동영상 자막]1. Windows 8 메일 앱에 계정 추가하기(편) SS-104(K)
본 영상은 일반 사용자들을 대상으로 개인 컴퓨터(PC) 사용에 도움을 주기 위한 목적으로 제작되었습니다. 본 영상에서 언급된 제품의 사용법 및 문제해결 가이드 등은 사용자들이 소유한 제품의 그것과 일치하지 않을 수 있음을 알려 드립니다. 본 영상의 제작자는 영상에 기재된 정보의 사용 결과에 대해 일체의 책임을 지지 아니하며, 동영상의 내용과 직접적인 관련이 없는 제품의 결함, 사용자의 부주의 등으로 인하여 발생하는 문제에 대하여도 아무런 책임이 없음을 알려 드립니다.
※ 휴대폰 메신저 대화가 시작됩니다.
친구 : Windows8 메일 앱에 MS 계정 말고 더 추가할 수 있을까?
나 : 네이버, 다음, 구글 메일 같은 계정 얘기하는 거지?
친구 : 응, 메일 계정이 너무 많아. PC에서 한 번에 확인했으면 좋겠는데..
나 : 그거 생각보다 간단해. IMAP을 사용하면 되거든..
친구 : IMAP? 그게 뭔데?
나 : 메일을 동기화하는 방법이야.
Windows 8 메일 앱에 메일 계정을 추가해서 동기화할 수 있어.
친구 : 그래? 어떻게 하는 거야?
나 : (동영상 파일)이거 보고 따라해봐!!
(동영상아이콘을 손가락으로 터치하는 장면으로 진행되면서 아래 설명으로 진행됩니다.)
2. ‘메일’ 앱을 사용하려면, Microsoft 계정이 필요합니다. 이미 MSN이나, MS Live 계정이 있으면 그대로 사용해도 되고, 새로운 Microsoft 계정을 만들수도 있어요. 먼저 Microsoft 계정을 만들어 볼게요.
3. 윈도우 시작화면에서 ‘Internet Explorer’를 클릭하세요. 주소창에 아래에 자막에 주소를 입력해서 사이트로 이동하세요. 이름과 사용자정보를 입력해서 Microsoft 계정을 새로 등록하세요. 인터넷 익스플로러를 닫고, 윈도우 시작화면에서 ‘메일’ 앱을 클릭하세요.
4. Microsoft 계정을 입력하고 ‘저장’ 버튼을 클릭하세요. Microsoft 계정으로 로그인 하였습니다. Gmail, Naver, Daum의 메일 계정을 추가하기 위해서는 IMAP 설정을 사용함으로 설정해야 합니다. ‘메일’앱에?Google 메일 계정들을 등록해볼게요. ‘Windows + C’ 키를 입력한 후 ‘설정’을 클릭하세요. ‘계정’을 클릭하세요. ‘계정 추가’를 클릭한 후 ‘Google 연결’을 클릭하세요. Gmail 계정과 비밀번호를 입력하고 ‘연결’ 버튼을 클릭하세요. 비슷한 방법으로 다른 계정들도 추가할 수 있어요. ‘메일’엡에서 ‘Windows + C’ 키를 입력한 후 ‘설정’을 클릭하세요. ‘계정’을 클릭하세요. ‘계정 추가’를 클릭한 후 ‘다른 계정’을 클릭하세요. 메일주소와 암호를 입력한 후, ‘연결’ 버튼을 클릭하세요.
5. 메일 계정이 추가되면, ‘앱’에서 직접 메일을 보낼 수 있어요. 오른쪽 위에 ‘+'(더하기) 아이콘을 클릭하세요. ‘받는 사람’에 수신인을 입력하세요. 참조인을 추가한다면 ‘참조’에 수신인을 입력하세요. 제목과 본문메시지를 추가한 후 오른쪽 위에 메일 아이콘을 클릭하세요. 메일을 보내고 나면, ‘보낸 편지함’에서 보낸 메일을 다시 확인할 수 있어요. 윈도우 시작화면의 메일앱에 계정 추가하는 방법이 어렵지 않죠? 앞으로도 다른 동영상을 통해서 다시 만나요.
6. ※ 휴대폰 메신저 대화가 다시 시작됩니다.
친구 : 아~ 이렇게 하면 되는구나~
나 : 어때? 정말 쉽지? 필요한 부분은 마지막에 정리해 놨어
친구 : 진짜 진짜 고마워! 지금 바로 따라 해봐야겠어!
나 : 그래! 아 그리고 www.samsung.com/sec에 가면 더 많은 자료를 찾아 볼 수 있어~
혹시 다른 문제가 생기면 접속해 봐!
친구 : 고마워! 친구
7. ※ 마지막으로 정리한 내용입니다.
– 인터넷에 연결되어 있는 상태로 진행.
– Microsoft 계정을 가지고 있어야 함.
– 추가하고자 하는 메일의 계정이 IMAP을 사용하도록 설정되어 있어야 함.
1. 윈도우 시작화면에서 ‘Internet Explorer’ 클릭
2. “http://signup.live.com/” 입력
3. Microsoft 계정 새로 등록
4. 윈도우 시작화면에서 ‘메일’ 클릭
5. Microsoft 계정 입력 후 ‘설정’ 클릭
6. Microsoft 계정으로 로그인
7. IMAP 사용 체크 후 변경 저장
8. ‘Windows + C’ 입력 후 ‘설정’ 클릭
9. ‘계정’ 클릭
10. ‘계정 추가’클릭 후 ‘Google 연결’ 클릭
11. Gmail 계정 입력 후 ‘연결’ 버튼 클릭
12. ‘Windows + C’ 입력 후 ‘설정’ 클릭
13. ‘계정’ 클릭
14. ‘계정 추가’ 클릭 후 ‘다른 계정’ 클릭
15. 메일 주소와 암호 입력 후 ‘연결’ 버튼 클릭
Windows 8: Using the Mail App
Lesson 12: Using the Mail App
/en/windows8/using-the-people-app/content/
Using the Mail app
The Mail app offers a new way to view and manage your email messages. In many ways, the Mail app is very similar to other email applications like Outlook or Gmail, but its redesigned interface may feel a little confusing at first. In this lesson, you’ll learn how to send, receive, and reply to email messages using the Mail app. You’ll also learn how to organize your inbox, add multiple email accounts, and modify your account settings.
Getting started with mail:
To open the Mail app, locate and select Mail on the Start screen. The Mail app will appear.
Opening the Mail app
The first time you open the Mail app, you will need to connect an email account to start sending and receiving email. If you are signed in to Windows 8 with a Microsoft account, the Mail app will request to connect with that email address. Enter your account information, and then click Connect. Your inbox will appear.
Connecting an email account to the Mail app
If you have already connected an email service with the People app, such as Hotmail or Gmail, you will not need to connect to the account again.
Click the buttons in the interactive below to become more familiar with the Mail app interface.
Switch Accounts If you have multiple email accounts connected to the Mail app, click the desired account to switch to that inbox. Shortcut Buttons Use these buttons to create a new message, reply to a message, or delete a message. Current Messages Messages in the selected folder will appear in the center of the Mail app. Unread messages will be marked in bold. Click a message to view it in the Message pane. Folders Click to navigate between different folders. The number of unread messages will be displayed beside each folder. Current Account The name of the current email account will be displayed in the upper-left corner. Message Pane The selected message will appear on the right-side of the screen in the Message pane.
Sending email:
You’ll use the Compose pane to write and send messages from the Mail app. From here, you’ll add the email address of the recipient(s), the subject, and the body of the email, which is the message itself.
To compose a new message:
Locate and select the New Message button.
Clicking the New Message button The Compose pane will appear.
The Compose pane You’ll need to add one or more recipients. There are two ways to add recipients: You can either type one or more email addresses, separated by commas, or select the word To to choose recipients from your contacts.
If you choose to add a recipient from your contacts, the People app will open. Choose the desired contact(s), and then select Add.
Adding a recipient from the People app Type a Subject for the message.
Adding a Subject to the message Type the body of the message. If you want to attach a file, save a draft, or include special formatting, such as font styles, bolding, or italics, right-click to open a menu at the bottom of the screen.
Compose options with the right-click menu When you are satisfied, click the Send button. The message will be sent, and the inbox will appear.
Clicking the Send button
If a recipient is already one of your contacts, you can start typing that person’s first name, last name, or email address, and the contact will appear below the To field. Press Enter to add the contact as a recipient.
Adding an existing contact as a recipient
Reading and replying to messages
By default, any email you receive will go to your inbox. Unread emails are always bold.
Unread emails in the inbox
To read and reply to a message:
From the Mail app, locate and select the message you want to read.
Selecting a message The message will appear on the right side of the screen in the Message pane.
Viewing the selected message in the Message pane
To reply to the message, click the Reply button, and then select your reply option from the drop-down menu.
Choosing reply options The Compose pane will appear. Type your message. When you are satisfied, click the Send button to send your message.
Replying to a message
Organizing your mail
After you’ve used the Mail app for a while, your inbox can start to become cluttered with old messages. You can keep your inbox organized by moving messages to folders or deleting messages you no longer need.
To move a message to a folder:
Locate and select the message you wish to move.
Selecting a message to move Right-click and then select the Move button from the menu at the bottom of the screen.
Clicking the Move button Select the desired folder for the message.
Choosing the desired folder The message will be moved to the selected folder.
The message moved to the selected folder
To delete a message:
There are two ways to delete a message. You can either:
Click the Delete button when viewing any email.
Clicking the Delete button
when viewing any email. Select the desired message(s) and then press the Delete key on your keyboard.
To delete messages permanently, you’ll need to access the Deleted folder and then delete the messages again.
Deleting messages permanently
Adding multiple accounts
If you use more than one email account—for example, one for personal email and one for work email—you can add multiple accounts to the Mail app, allowing you to read all of your messages from the same place.
To add an account:
In the Mail app, hover the mouse in the lower-right corner to access the Charms bar, then select Settings. Clicking settings The Settings pane will appear on the right. Select Accounts.
Clicking Accounts The Accounts pane will appear. Click Add an account.
Adding an account Select the service you wish to use. In our example, we’ll add a Yahoo! account.
Selecting an account
Enter your username and password, then click Connect.
Clicking Connect Your account will be connected, and email will appear automatically in your inbox. Any contacts from the account will also be imported into the People app.
The synced inbox
To switch between inboxes:
If you have multiple email accounts connected to the Mail App, you will need to switch between inboxes to view all your messages.
Locate and select the desired account in the lower-left corner of the Mail app.
Switching between inboxes The selected inbox will appear.
The selected inbox
Modifying account settings
If you want to control how often email will be downloaded to the Mail app, change your email signature, or choose additional options for your connected email accounts, you’ll need to modify your account settings.
To modify account settings:
In the Mail app, hover the mouse in the lower-right corner to access the Charms bar, then select Settings. The Settings pane will appear. Select Accounts.
Clicking Accounts The Accounts pane will appear. Select the account you wish to modify. In our example, we’ll choose Gmail.
Selecting an account The account settings will appear. You may have to scroll down to see all of the settings. Change the settings as desired.
Account settings for Gmail
/en/windows8/internet-explorer/content/
So you have finished reading the 윈도우 8 메일 topic article, if you find this article useful, please share it. Thank you very much. See more: Windows 10 mail setup, Windows 10 Mail app, Microsoft Gmail, Mail and calendar, Outlook desktop download, Outlook 2016 update