
You are looking for information, articles, knowledge about the topic nail salons open on sunday near me 안드로이드 x86 on Google, you do not find the information you need! Here are the best content compiled and compiled by the https://toplist.maxfit.vn team, along with other related topics such as: 안드로이드 x86 안드로이드 x86 후기, 안드로이드 x86 게임, 안드로이드 x86 설치, 안드로이드 x86 와이파이, 안드로이드 x86 다운로드, Android-x86 Android 12, 안드로이드 x86 듀얼부팅, Bliss OS
안드로이드-x86 – 위키백과, 우리 모두의 백과사전
- Article author: ko.wikipedia.org
- Reviews from users: 6976
 Ratings
 - Top rated: 3.2
- Lowest rated: 1
- Summary of article content: Articles about 안드로이드-x86 – 위키백과, 우리 모두의 백과사전 안드로이드-x86(Andro-x86)은 안드로이드를 인텔 32비트 CPU 계열로 포팅한 버전의 운영 체제이다. 이 프로젝트는 본래 안드로이드 소스에 대한 패치 형식으로 존재 … …
- Most searched keywords: Whether you are looking for 안드로이드-x86 – 위키백과, 우리 모두의 백과사전 안드로이드-x86(Andro-x86)은 안드로이드를 인텔 32비트 CPU 계열로 포팅한 버전의 운영 체제이다. 이 프로젝트는 본래 안드로이드 소스에 대한 패치 형식으로 존재 …
- Table of Contents:
리믹스 OS[편집]
각주[편집]
외부 링크[편집]

윈도우 태블릿에 Android-x86 설치 후기 – 미르의 IT 정복기
- Article author: itmir.tistory.com
- Reviews from users: 1192 Ratings
- Top rated: 3.4
- Lowest rated: 1
- Summary of article content: Articles about 윈도우 태블릿에 Android-x86 설치 후기 – 미르의 IT 정복기 그러던 중 andro-x86 이라는 프로젝트를 알게 되었습니다. 구형 x86 기기에 안드로이드를 부팅시키는 프로젝트입니다. …
- Most searched keywords: Whether you are looking for 윈도우 태블릿에 Android-x86 설치 후기 – 미르의 IT 정복기 그러던 중 andro-x86 이라는 프로젝트를 알게 되었습니다. 구형 x86 기기에 안드로이드를 부팅시키는 프로젝트입니다. 서론 신형 노트북을 구매하면서, 이전까지 사용하던 윈도우 태블릿은 이제 구형 기기가 되었습니다. 약 7년 동안 썼던 기기이다보니 액정에 하얀 멍도 있고 상태가 그리 좋다고 말할 수 없습니다. 그렇기 때문에..
- Table of Contents:
티스토리 뷰
서론
Android-x86 iso 설치 USB 만들기
Android-x86 설치하기
Android-x86 구동 화면
앱 호환성 및 버그 목록
유튜브 영상 스크린샷
결론
구형 노트북 활용하기 – 안드로이드(Android 9) 설치
- Article author: blogger.pe.kr
- Reviews from users: 20504 Ratings
- Top rated: 4.1
- Lowest rated: 1
- Summary of article content: Articles about 구형 노트북 활용하기 – 안드로이드(Android 9) 설치 1. x86 Andro ISO 이미지 다운로드 및 설치 USB 만들기. 먼저 다음의 웹사이트에서 x86 안드로이드 iso 이미지 파일을 다운르도 받는다. http://andro … …
- Most searched keywords: Whether you are looking for 구형 노트북 활용하기 – 안드로이드(Android 9) 설치 1. x86 Andro ISO 이미지 다운로드 및 설치 USB 만들기. 먼저 다음의 웹사이트에서 x86 안드로이드 iso 이미지 파일을 다운르도 받는다. http://andro … 오래된 노트북은 애물단지로 전락하는 경우가 많다. 버리긴 아깝고 쓰자니 새 노트북을 두고 낡고 느린 노트북을 사용하긴 싫으니.. 그런 노트북이 있다면 스마트폰의 운영체제인 안드로이드를 설치해 유튜브 시청..
- Table of Contents:
Header Menu
Main Menu
구형 노트북 활용하기 – 안드로이드(Android 9) 설치
‘나의 취미’ 관련 글
Sidebar – Right
Sidebar – Footer 1
Sidebar – Footer 2
Sidebar – Footer 3
Copyright © taeho’s life logger All Rights Reserved
Designed by JB FACTORY
티스토리툴바
Android-x86 download latest version
- Article author: www.fosshub.com
- Reviews from users: 15364 Ratings
- Top rated: 3.6
- Lowest rated: 1
- Summary of article content: Articles about Android-x86 download latest version The Andro-x86 software allows the mobile Google Andro™ operating system to function on devices that are powered by AMD x86 / Intel processors rather than … …
- Most searched keywords: Whether you are looking for Android-x86 download latest version The Andro-x86 software allows the mobile Google Andro™ operating system to function on devices that are powered by AMD x86 / Intel processors rather than … Download Android x86 Free project to port Android open source project to x86 platform.android x86 download
- Table of Contents:
Downloads
Description
Android-x86 Review
안드로이드-x86 설치 두 번째 도전
- Article author: kepper.tistory.com
- Reviews from users: 5203 Ratings
- Top rated: 4.0
- Lowest rated: 1
- Summary of article content: Articles about 안드로이드-x86 설치 두 번째 도전 구글 플레이 사용이 가능한 안드로이드-x86을 설치해보기로 했습니다. 설치에 도전할 노트북은 한성컴퓨터의 P54M으로. 인텔 i5-4210M CPU에 DDR3 8기가 … …
- Most searched keywords: Whether you are looking for 안드로이드-x86 설치 두 번째 도전 구글 플레이 사용이 가능한 안드로이드-x86을 설치해보기로 했습니다. 설치에 도전할 노트북은 한성컴퓨터의 P54M으로. 인텔 i5-4210M CPU에 DDR3 8기가 … 새 노트북이 생겼으니, 이전에 한 번 실패했던 안드로이드-x86을 옛날 노트북에 다시 설치해보기로 했습니다. 안드로이드-x86은 모바일 기기가 아닌 x86 프로세서를 사용하는 PC에 안드로이드를 설치, 구동하려는..
- Table of Contents:
태그
‘잡동사니전자기기’ Related Articles
티스토리툴바

[안드로이드 x86 OS(Android x86)] 설치 – 오래된 태블릿PC [TG TAB TA102] : 네이버 블로그
- Article author: blog.naver.com
- Reviews from users: 48675 Ratings
- Top rated: 4.5
- Lowest rated: 1
- Summary of article content: Articles about [안드로이드 x86 OS(Android x86)] 설치 – 오래된 태블릿PC [TG TAB TA102] : 네이버 블로그 이제 안드로이드 x86을 설치해보자. 이전에 설치한 피닉스OS하고 비슷하다. 설치용USB와 키보드를 연결 후, 전원을 누른다. 그리고 F12버튼을 연타 … …
- Most searched keywords: Whether you are looking for [안드로이드 x86 OS(Android x86)] 설치 – 오래된 태블릿PC [TG TAB TA102] : 네이버 블로그 이제 안드로이드 x86을 설치해보자. 이전에 설치한 피닉스OS하고 비슷하다. 설치용USB와 키보드를 연결 후, 전원을 누른다. 그리고 F12버튼을 연타 …
- Table of Contents:
블로그
악성코드가 포함되어 있는 파일입니다
작성자 이외의 방문자에게는 이용이 제한되었습니다
![[안드로이드 x86 OS(Android x86)] 설치 - 오래된 태블릿PC [TG TAB TA102] : 네이버 블로그](https://blogthumb.pstatic.net/MjAyMDAxMDNfMTMy/MDAxNTc3OTg3MDcxMzg0.ICEVVAYo0pcJKdgcoPAEVX7t7psgL0PUiBvD_4-TUOQg.exo3sDeS4CxpcFSlIDoBgrUCHLzr-YNG3QchxCO7lQgg.JPEG.indra494/20200103_004638.jpg?type=w2)
See more articles in the same category here: toplist.maxfit.vn/blog.
윈도우 태블릿에 Android-x86 설치 후기
서론
신형 노트북을 구매하면서, 이전까지 사용하던 윈도우 태블릿은 이제 구형 기기가 되었습니다.
약 7년 동안 썼던 기기이다보니 액정에 하얀 멍도 있고 상태가 그리 좋다고 말할 수 없습니다. 그렇기 때문에 중고로 처분한다고 하더라도 얼마 받지 못하더라고요.
따라서 구석에 계속 처박혀 있을 예정이었던 기기였습니다.
그러던 중 android-x86 이라는 프로젝트를 알게 되었습니다. 구형 x86 기기에 안드로이드를 부팅시키는 프로젝트입니다.
Android-x86 iso 설치 USB 만들기
www.android-x86.org/download.html
위 사이트를 통해 android-x86.iso 파일을 다운 받습니다.
이후 Rufus라는 프로그램을 통해 빈 usb에 Android-x86 설치 USB를 만들어주면 됩니다.
이후, 바이오스 부팅 옵션을 설정하여 방금 만든 부팅 USB를 통해 부팅하면 1단계가 끝납니다.
USB로 부팅하기 전에 Android-x86을 설치할 파티션을 미리 윈도우에서 만들어주는 것을 추천합니다.
윈도우에서 GUI로 파티션을 설정하는게 텍스트를 입력하여 설정하는 것보다 더 편하기 때문입니다.
이렇게 파티션을 따로 만들면 윈도우와 안드로이드를 오가며 부팅할 수 있습니다.
윈도우를 깔끔하게 지우고 설치하실 분은 파티션을 미리 잡아두지 않아도 됩니다.
Android-x86 설치하기
이제 Android-x86을 본격적으로 설치해봅시다.
윈도우에서 이미 파티션을 잡아두었다면 그걸 바로 선택하시면 되고,
그렇지 않다면 Create/Modify pertitions 메뉴를 선택하여 파티션을 편집해줍시다.
저는 윈도우에서 빈 공간(free space)만 잡아두었고, 파티션을 만들지는 않았습니다.
New 메뉴를 선택하여 빈 공간에 파티션을 잡아주고, Write를 통해 변경 내용을 실제로 적용합니다.
이제 unknown이라는 빈 볼륨이 만들어졌는데요.
이 파티션을 선택해주면 포맷 방식을 결정하고 다음 단계로 넘어갑니다.
/system에 접근할 수 있도록 할 것인지 선택하는 부분입니다.
저는 Yes를 선택하여 /system 쓰기 권한을 얻기로 결정했습니다.
이제 선택한 파티션에 Android가 설치되기 시작합니다.
용량이 크지 않아 윈도우보다 훨씬 빠르게 설치되므로 화장실 한 번 갔다 오시면 설치가 거의 끝나갈 겁니다.
이제 설치가 완료되었다는 문장이 나왔습니다.
Run LineageOS를 선택하여 안드로이드를 부팅해봅시다.
참고로 LineageOS의 전신이 CyanogenMod 입니다. 커스텀 롬으로 유명했던 CyanogenMod가 맞습니다.
부팅을 조금 기다리면 아래처럼 초기 설정 화면이 나옵니다.
화면의 멍 자국이 신경쓰이네요. ㅠㅠ
이렇게 초기 설정을 끝내면, 드디어 홈 화면이 나오며 설치가 끝납니다.
Android-x86 구동 화면
드디어 안드로이드를 윈도우 태블릿에 부팅했습니다.
위 스크린샷은 제가 각종 앱을 설치한 후 캡쳐한 홈 화면입니다.
안드로이드 태블릿이 하나 늘어난 기분이네요.
안드로이드 버전은 7.1.2 입니다.
앱 호환성 및 버그 목록
아쉽게도 모든 앱이 호환되지는 않습니다.
arm으로 빌드된 앱은 대부분 작동하지 않는 것 같으며, 어떤 앱은 아예 실행되지도 않았습니다.
그래서 작동하는 기능과 작동하지 않는 기능을 분류해보았습니다.
Working
물리버튼(전원,볼륨키)
터치디스플레이
내장스피커
마이크로 USB포트
SD카드
전원충전
3.5파이이어폰잭
Wi-Fi
Bluetooth
Not Working
전후면카메라
내장마이크
가속도계센서(화면회전)
일부앱호환성
Unknown
hdmi화면출력포트
스크린샷과 Working 리스트를 보면 Wi-Fi가 잡힌다는 것을 알 수 있는데요.
첫 부팅시에는 저도 인터넷이 잡히지 않았습니다.
그래서 구글링을 해본 결과, 이러한 영상을 발견할 수 있었습니다.
부팅 시에 Android-x86 (Debug) 모드로 진입하신 다음, 텍스트가 주르르 내려가다가 멈추면 exit를 두 번 입력하여 디버그 모드를 빠져나옵니다.
이러하니 Wi-Fi가 잡히기 시작했습니다…(도대체 무슨 원리인지는 모르겠습니다.)
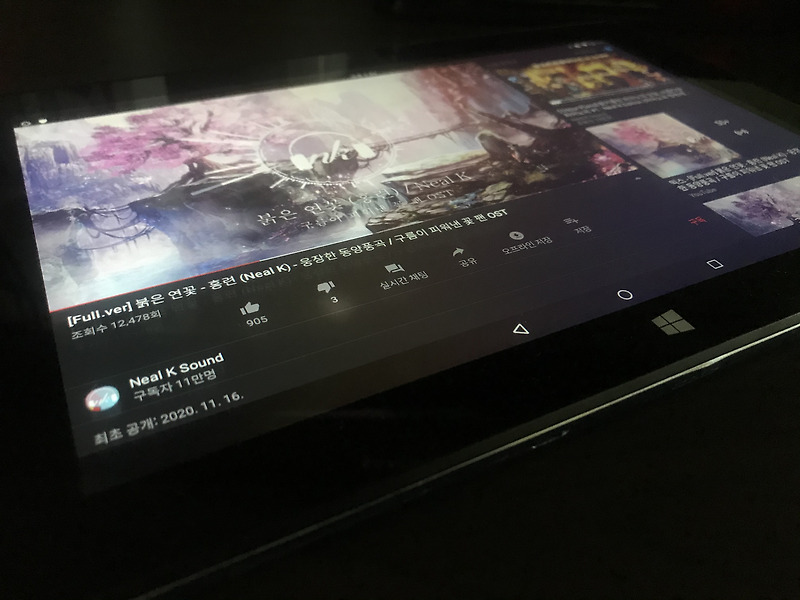
유튜브 영상 스크린샷
무엇을 찍을까 생각하다가, 유튜브를 찍어보았습니다.
몇 년 전부터 계속 듣던 Neal K님의 자작곡 영상입니다.
화면만 멀쩡하다면, 유튜브 머신으로 상당히 쓸만한 것 같네요
결론
카메라 드라이버가 잡히지 않아서 작동 LED가 계속 켜져있습니다.
배터리도 생각보다 빨리 닳아서 실사용하기에는 약간 무리가 있다고 봅니다.
장난감으로 쓰기에는 상당히 쓸만한 안드로이드 태블릿이 되었네요.
구형 기기의 생명이 연장되었습니다.
안드로이드(Android 9) 설치
오래된 노트북은 애물단지로 전락하는 경우가 많다. 버리긴 아깝고 쓰자니 새 노트북을 두고 낡고 느린 노트북을 사용하긴 싫으니.. 그런 노트북이 있다면 스마트폰의 운영체제인 안드로이드를 설치해 유튜브 시청용 등으로 만들어 잠시 갖고 노는 것도 재미있다. 단, 대부분의 최신 게임은 실행되지 않는 다는 것을 참고하자. 그 이유는 안드로이드 게임앱이 Java Code의 성능한계를 극복하기 위해 네이티브 API(C로 만들어진)를 사용해 개발되기 때문이다.
어찌됐든 x86 계열 CPU를 사용하는 대부분의 구형 노트북에 안드로이드, 정확하게는 9 버전(Pie)를 설치해봤다.
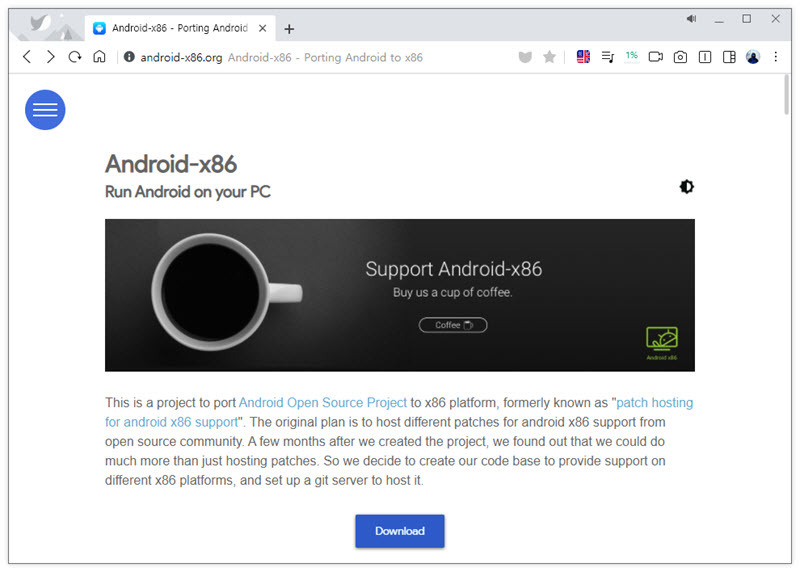
1. x86 Android ISO 이미지 다운로드 및 설치 USB 만들기
먼저 다음의 웹사이트에서 x86 안드로이드 iso 이미지 파일을 다운르도 받는다.
http://android-x86.org
x86 안드로이드 배포 사이트
아래의 다운로드 버튼을 누르면 두개의 미러사이트가 나오는데.. OSDN과 FOSSHUB 다. 필자는 FOSSHUB에서 다운로드를 받았다. 왠지는 모르겠지만 현재 OSDN에는 안드로이드 8버전으로 보이는 ISO 이미지를 배포하고 있고 FOSSHUB에서는 9버전을 다운로드 받을 수 있었다.
ISO 파일을 다운르도 받았으면 Rufus와 같은 프로그램을 사용해 USB 메모리에 ISO 파일을 부팅가능한 형태로 써준다.
rufus를 사용해 boot usb 만들기
“시작” 버튼을 누르면 다음과 같은 메시지가 표시되는데… 권장 방식을 사용하면 된다.
Rufus ISOHybrid 모드로 쓰기
시간이 조금 걸리지만 쓰기가 완료되면 USB 메모리를 구형 노트북에 꼽고 USB로 부팅한다. 만약 USB로 부팅되지 않으면 노트북의 Setup에 들어가 Boot 순서를 USB로 바꿔주고 시도해야 한다.
2. 안드로이드 9을 노트북에 설치하기
안드로이드9 설치 USB가 인식되어 부팅되면 다음과 같이 Android-x86 9 설치 프로그램이 실행된다.
x86 Android 9.0 설치 화면
위 화면처럼 Installation 메뉴를 선택하면 다음과 같이 파티션을 설정할 수 있다. 다른 OS가 설치된 파티션이 있다거나 하면 그냥 무시하거나 삭제하겠다는 옵션을 선택하면 된다. 파티션은 다음과 같이 sda1, 2, 3으로 기본 설정이 된다.
x86 android 설치 중 파티션 설정
sda2를 선택하고 OK를 누르면 된다.
설치할 파티션을 어떤 파일시스템 유형으로 포맷할 것인지 묻는다. 두번째의 ext4 유형을 선택한다. 리눅스에 가장 최적화된 파일시스템 유형이다.
파일시스템 타입 선택
귀찮지만 정말 포맷하겠냐고 묻는다.
진짜로 포맷할래?
Yes를 선택하면 포맷이 진행되고 파일복사까지 진행된다.
포맷하기 & 파일 복사
멀티부팅을 위한 GRUB2를 설치할지 묻는다. 멀티부팅을 사용하지 않을거면… Skip을 선택해도 된다.
멀티부팅을 위한 GRUB2 설치할래?
디버깅을 쉽게하기 위해 /system 디렉토리를 read-write 모드로 설치할지를 묻는다.
/system 디렉토리 퍼미션
Yes 또는 No를 선택한다. 설치에 영향을 주진 않는다.
파일 설치가 완료되면 리부팅할 것인지 바로 Android-x86을 실행할 것인지를 묻는다. 아무거나 선택하면 된다. 리부팅한다면 USB 메모리를 제거하고 리부팅한다.
x86 android 설치 완료
어쨌든 android 로고가 보이며 안드로이드9가 구동된다.
노트북에서 android 9가 실행된다
3. 안드로이드 9 초기설정 그리고 에러 피해가기
노트북이 처음, 안드로이드로 부팅되면 초기설정 화면이 실행된다.
안드로이드 9 첫 실행
처음엔 언어가 영어로 표시되는데 한글로 변경하면 된다. 그리고 “시작” 버튼을 누른다.
여기서 와이파이를 연결하면…. 안된다. (적어도 2021년 7월에 다운로드 받은 android-x86_64-9.0-r2-k49.iso 버전에서는 그렇다.)
x86 android 설치 – Wifi에 연결
와이파이에 연결하고 나면 업데이트를 찾고, 구글계정에 로그인하는 단계가 차례대로 진행되는데 구글 계정에 로그인하는 “구글 플레이 서비스”가 계속 에러가 발생하면서 앱이 종료된다. 그리고 와이파이 연결부터 구글계정 로그인 과정이 무한히 반복된다.
누군가는 구글플레이 서비스의 앱 관리자에서 캐시와 데이터를 삭제하면 된다고 하는데… 필자의 경우에는 그래도 안된다. 이 문제를 근본적으로 해결하기 위해서는 “구글 플레이 서비스”를 업데이트해야 한다.
결국 Wifi 연결단계에서 “건너뛰기”를 선택해 구글플레이 앱이 실행되지 않은채 초기설정이 마무리되도록 했다.
와이파이 연결을 건너뛰면 날짜 및 시간 설정화면으로 넘어간다. 날짜와 시간이 틀리다면 맞춰준다.
날짜 및 시간 설정
구글 서비스 약관과 위치 사용 등 설정화면이 실행된다. “더보기”를 눌러 다음페이지를 확인한다.
구글 서비스 설정
끝까지 내용을 확인하고 완료한다.
구글 서비스 설정
잠금화면 해제를 위한 보안 기능을 선택한다. “나중에”를 선택해도 된다.
태블릿 보호
비밀번호를 선택하면 다음 화면처럼 비밀번호를 설정하게 된다.
화면잠금 해제용 비밀번호 설정
이제 초기설정이 완료되고 홈 화면에서 사용될 앱을 선택하라 한다. 둘 중 아무거나 선택한다. 나중에 변경할 수 있다.
홈 앱 선택
위 화면에서 홈 앱으로 Quickstep을 선택했을 때의 홈 화면이다.
Quickstep 홈 앱
Taskbar 를 선택했을 때의 홈 앱 이다.
Taskbar 홈 앱 화면
4. 구글 플레이 서비스 업데이트
앞에서 구글 플레이 서비스의 에러로 인해 초기 설정이 무한 루프에 빠지는 문제가 있어 와이파이 연결을 건너뛰고 초기설정을 마쳤다.
이제 네트워크에 연결하면 구글 계정 로그인을 하지 않고 구글 플레이서비스를 업데이트 할 수 있었다.
와이파이는 상단바를 아내로 쓸어내려 (상단바에서 마우스 좌클릭 상태에서 아래로 끌어내림) 와이파이 버튼을 누르면
와이파이의 비밀번호를 입력하고 인터넷에 연결할 수 있다.
인터넷에 연결되면 구글 플레이 서비스를 비롯해 몇개의 업데이트를 진행할 수 있다. 업데이트를 진행한 뒤 플레이스토어를 실행하고 구글계정으로 로그인하면 정상적으로 구글 플레이 스토어를 사용할 수 있다.
5. 한글 입력기 설치
이 상태에서는 영문만 입력이 가능하다. 이 문제는 플레이 스토어에서 한글 입력기를 설치하면 되는데 다른 입력기 앱은 안되는 것이 많고 구글의 기본 입력기인 “Gboard – Google 키보드”를 찾아 설치하면 된다.
다음과 같이 영문으로 영문과 한글을 그대로 입력하면 알아서 입력기를 찾아준다.
google 한국어 입력기 검색
Gboard – Google 키보드 앱
Gboard – Google 키보드 앱
6. 안드로이드 종료하기
음..그런데.. 끄기 버튼이 없다. 이전 버전에서는 지원됐던것 같은데 종료 버튼이 어디에도 없다. 이럴 땐 콘솔에서 종료하면 된다.
Alt – F1 키를 누르면 다음과 같이 콘솔로 전환되는데… halt 명령을 입력하면 바로… 끌 수 있다.
Android x86 종료하기
재미난 장난감이 생겼다. 단, 게임이 안되니 활용도가 50%는 낮아진 듯.
Android-x86
Description
Download Android-x86 a free, open source project (formely known as “patch hosting for android x86 support”) that allows you to run Android™ on x86 operating systems.
It is a port of the well-known “Android Open Source Project” led and offered for free.
Trademark Note: Google and the Google logo are registered trademarks of Google Inc. Android is a trademark of Google Inc. Please note that Android-x86 project is not affiliated with Google Inc or other registered trademarks such as Android™.
Android-x86 Review
The new Android-x86 software helps people use the Android operating system on a laptop or desktop computer. Though the software has its merits, it is also somewhat flawed. Let’s dig into the details of Android-x86.
Who It is For
The Android-x86 software allows the mobile Google Android™ operating system to function on devices that are powered by AMD x86 / Intel processors rather than RISC-based ARM chips. Those who would like a single Linux-based operating system to run on all of their devices will find that Android-x86 is a solid alternative.
The Installation Process
Android-x86 contains two files. The first is the ISO file that can be booted on any device with legacy BIOS. The second is an EFI image that one can be used on contemporary computing devices that have UEFI firmware. Select the one that is appropriate for your hardware. You will be taken to a screen where you can run the software in a live session without actually installing it or choose a direct installation. You can even install Android-x86 onto a USB drive so you have a bootable USB stick at your disposal. Opting for this installation route is quite convenient as it will allow your USB drive to save some of its memory capability. All in all, the Android-x86 installation process is quite easy. The one minor fault with the installation process is that the installer is not capable of formatting ext3 file systems.
Ease of Use
Run Android-x86 on all of your computers and you will likely be fairly impressed with its performance. The software requires that you create / sign into your Google account when first using it on a PC. However, a plan vanilla Android will load if you fail to sign in through a Google account. This allows you to access the world wide web through the standard Android web browser. You will also have to configure your WiFi. When the program is up and running, you will use a ring-shaped mouse-like pointer as the indicator for clicks. Certain navigation functions require that the user holds down a key on the keyboard or click to transition from one desktop to another. Go ahead and access the Google Play™ store as well as your Google Chrome / mobile Android settings to populate your PC’s new operating system.
The software features two home screens and six different wallpapers. Both home screens have a Google search box and a voice input icon toward the center of the screen. The bottom of the screen has a see-through dock row with the typical “home”, “return” and “recent apps” buttons. Above this row are five conveniently placed icons.
Benefits
The benefit to running Android on each device is that it allows you to keep all of your apps, settings and Google services aligned. Thankfully Android-x86 makes this happen without too many major obstacles. The new version of Android-x86 is fairly intuitive and easy to learn. It runs much faster than previous versions of Android™ on dedicated hardware. Use it on a variety of computing devices from netbooks to tablets and beyond and you’ll likely be content with its performance Hardware acceleration is now available for Vmware ad Nvidia chips. A new Hal sensor even supports GPS.
Drawbacks
The software’s download page isn’t the easiest to use as it shows earlier versions of the software. Many users have complained that they had to resort to the “release notes web page” to access the download. Some users have reported that there are issues with the software’s suspend and resume features. Others have complained about the software being limited to strictly the Android™ web browser.
In some instances when a live session is occurring, the web browser will fail to start and an error window will pop up. Yet some users have stated that after they rebooted the same hardware, this browser problem goes away. Many users have complained that the app has failed to launch or completely failed to even open at all. Some report that the apps open but crash shortly afterward. If this occurs, go ahead and reboot your computer. It just might provide a temporary fix until Android-x86 developers come up with a permanent solution to this widely reported problem.
The Verdict
Android-x86 should be lauded for its ability to seamlessly run the Android operating system on a laptop or desktop powered by AMD x86 / Intel processors. However, some users will be frustrated with the software’s flaws and unreliability. If you aren’t in any hurry to use your Android™ system on your traditional computers, it might be prudent to wait until the next version of Android-x86 is released.
So you have finished reading the 안드로이드 x86 topic article, if you find this article useful, please share it. Thank you very much. See more: 안드로이드 x86 후기, 안드로이드 x86 게임, 안드로이드 x86 설치, 안드로이드 x86 와이파이, 안드로이드 x86 다운로드, Android-x86 Android 12, 안드로이드 x86 듀얼부팅, Bliss OS